
Ridgid Pipe Threader Manual: A Comprehensive Guide
This manual serves as your complete resource for operating and maintaining Ridgid pipe threaders, covering models like the 535 and 700,
and the compact ROPOWER 50R․ It details threading processes, safety, and standards․
Ridgid pipe threaders are renowned within the plumbing and pipeline industries for their durability, precision, and reliability․ This manual aims to equip both novice and experienced users with the knowledge to effectively utilize these powerful tools․ From compact models like the ROPOWER 50R, ideal for portable jobs, to robust machines like the Ridgid 535 and 700, a Ridgid threader offers solutions for a wide range of pipe threading applications․
Understanding the capabilities of your Ridgid threader is crucial for achieving clean, accurate threads essential for leak-proof connections․ This guide will delve into the specifics of various models, covering features, specifications, and operational procedures; Whether you’re working with NPT or BSPT threads, or even specialized standards like UNI EN 10226-1, this manual provides the necessary information․ Proper maintenance, as outlined within, ensures longevity and consistent performance of your investment․
Understanding Pipe Threading Basics
Pipe threading is the process of creating helical ridges – threads – on the exterior of a pipe to allow it to be screwed into a fitting, creating a secure, leak-resistant joint․ The fundamental principle relies on accurately forming these threads to match the internal threads of the fitting․ It’s important to recognize that pipe thread dimensions differ from standard thread forms; a pipe thread with equal diameters has a larger overall size․
Different thread standards, such as NPT (National Pipe Thread) and BSPT (British Standard Pipe Thread), exist, each with unique angles and tolerances․ Selecting the correct die for the desired thread type is paramount․ This manual will guide you through understanding these distinctions․ Proper lubrication during threading is also vital, reducing friction and ensuring a clean, consistent thread․ Mastering these basics is the foundation for successful pipe joining using a Ridgid threader․
Safety Precautions When Using a Ridgid Pipe Threader
Prioritizing safety is crucial when operating a Ridgid pipe threader․ Always wear appropriate personal protective equipment (PPE), including safety glasses to shield against flying chips and gloves to protect your hands from sharp edges and rotating parts․ Ensure the work area is well-lit and free of obstructions․
Before commencing any threading operation, thoroughly inspect the machine for any damage or loose components․ Never operate a damaged threader․ Securely clamp the pipe in the chuck before initiating the threading process․ Maintain a firm grip on the handles and avoid reaching over the rotating head․ Disconnect power before making adjustments or changing dies․ Be mindful of pinch points and rotating machinery․ Following these precautions will minimize the risk of injury and ensure a safe working environment․

Ridgid Pipe Threader Models & Overview
Ridgid offers a diverse range of pipe threaders, including the robust 535 and 700 models, alongside compact options like the ROPOWER 50R, catering to various professional needs․
Ridgid 535 Pipe Threader: Features and Specifications
The Ridgid 535 pipe threader is a widely utilized, portable machine designed for field applications․ This model is known for its durability and ability to handle a broad spectrum of pipe sizes, typically ranging up to 2 inches․ It’s compatible with RIDGID OO-R, OO-RB, and O-R dies, offering versatility in threading different pipe materials․
Key features include a powerful motor and a robust feed system ensuring consistent and accurate threading․ The 535 boasts a quick setup time, minimizing downtime on job sites․ Its 19-page manual provides detailed instructions on operation, maintenance, and troubleshooting․ The machine’s design prioritizes user safety with features like a guarded chuck and emergency stop functionality․
Specifications generally include: a motor capable of delivering sufficient torque for various pipe types, a weight suitable for portability, and dimensions optimized for maneuverability in confined spaces․ The Ridgid 535 is a reliable choice for plumbers, pipefitters, and other professionals requiring a dependable threading solution․
Ridgid 700 Pipe Threader: Features and Specifications
The Ridgid 700 pipe threader represents a heavy-duty solution for demanding threading applications․ This manual threading machine is equipped with a robust frame and powerful ratchet mechanism, designed for consistent performance with larger diameter pipes․ It’s capable of handling pipes up to 4 inches, making it suitable for industrial and commercial projects․
A key advantage of the Ridgid 700 is its durability and ability to withstand rigorous use in challenging environments․ The 117-page manual provides comprehensive guidance on setup, operation, maintenance, and detailed troubleshooting procedures․ It features a two-speed feed mechanism, allowing operators to adjust threading speed based on pipe material and size․
Specifications typically include: a large capacity chuck, a powerful ratchet for efficient threading, and a sturdy base for stability․ The Ridgid 700 is often preferred for applications requiring high torque and precision, offering a reliable and long-lasting threading solution for professionals․
Compact Ridgid Pipe Threaders: ROPOWER 50R
The ROTHENBERGER ROPOWER 50R is a portable and efficient compact threading machine, offering fast and steady threading, trimming, and deburring capabilities up to 2 inches․ This model is ideal for on-site work and situations where space is limited, providing a versatile solution for various piping needs․
This manual details the ROPOWER 50R’s features, including its quick-rak modular system, enabling rapid construction of structures for manufacturing, storage, and assembly․ It’s designed for ease of use, with a focus on speed and precision․ The machine’s compact design doesn’t compromise on power or threading quality․

Key benefits include its portability, allowing for convenient transport and setup․ The ROPOWER 50R is a valuable tool for plumbers, HVAC technicians, and other professionals requiring a reliable and compact threading solution․ The manual provides detailed instructions for optimal performance and safety․
Components of a Ridgid Pipe Threader
Ridgid pipe threaders consist of crucial parts: threading heads, dies of various types and sizes, a secure chuck and collet system, and a precise feed mechanism with a ratchet․
Threading Heads: Types and Selection
Ridgid pipe threaders utilize different threading heads designed for specific pipe sizes and materials․ Understanding these types is crucial for achieving accurate and clean threads․ Generally, you’ll encounter heads categorized by their capacity – the maximum pipe diameter they can handle․ Selecting the correct head ensures proper die alignment and prevents damage to both the head and the pipe․
There are standard threading heads for general-purpose applications, and specialized heads for stainless steel or other harder materials․ These specialized heads often feature different cutting geometries and are constructed from more durable alloys․ Furthermore, some heads are designed for specific thread standards, like NPT or BSPT․ Always consult the Ridgid manual to verify compatibility between the threading head, the dies, and the pipe material you intend to thread․ Incorrect head selection can lead to incomplete threads, burrs, or even breakage․
Proper head selection also considers the pipe’s wall thickness․ Heavier-duty heads are necessary for thicker-walled pipes to ensure sufficient cutting force․ Regularly inspect threading heads for wear and tear, replacing them when necessary to maintain threading quality․
Dies: Understanding Die Types and Sizes
Dies are the cutting tools that form the threads on the pipe, and understanding their types and sizes is paramount for successful pipe threading․ Ridgid dies are categorized by thread standard (NPT, BSPT, etc․) and size, indicated in threads per inch (TPI)․ Using the incorrect die size will result in a non-functional connection․
NPT (National Pipe Tapered) dies create tapered threads commonly used in North America, while BSPT (British Standard Pipe Tapered) dies produce tapered threads used internationally․ Straight pipe dies, also available, create parallel threads for specific applications․ Dies are typically made from high-speed steel (HSS) or alloy steel, with HSS being suitable for general-purpose threading and alloy steel offering greater durability for harder materials․
Proper die maintenance is crucial․ Regularly inspect dies for chipped or worn teeth, and lubricate them during use to reduce friction and extend their lifespan․ Replace worn dies promptly to maintain thread quality and prevent damage to the pipe․ Always refer to the Ridgid manual for the correct die selection based on pipe material and desired thread standard․
Chuck and Collet System
The chuck and collet system securely holds the pipe during the threading process, ensuring accuracy and preventing slippage․ Ridgid pipe threaders utilize various chuck sizes to accommodate different pipe diameters․ Collets, inserted within the chuck, provide a precise and centered grip on the pipe’s outer surface․
Proper collet selection is vital; using the wrong size can damage the pipe or result in inaccurate threads․ The chuck’s jaws must be tightened evenly to distribute pressure and prevent deformation of the pipe․ Regularly inspect the chuck and collets for wear or damage, replacing them as needed to maintain optimal performance․
Maintaining cleanliness is also key․ Remove any debris or chips from the chuck and collet before each use to ensure a firm grip․ Refer to your Ridgid manual for specific instructions on chuck operation and collet selection for your particular model, ensuring safe and efficient pipe threading․
Feed Mechanism and Ratchet
The feed mechanism controls the rate at which the die advances into the pipe during threading, crucial for creating consistent and accurate threads․ Ridgid pipe threaders employ a ratchet system that allows for controlled, incremental feeding of the die․ This prevents overloading the machine and ensures a smooth threading process․
The ratchet engages with a pawl, allowing the operator to apply force in a controlled manner․ Proper lubrication of the feed mechanism and ratchet is essential for smooth operation and to prevent wear․ Regularly inspect the ratchet teeth and pawl for damage, replacing worn components promptly․
Understanding the ratchet’s operation is key to successful threading․ Avoid forcing the ratchet, as this can damage the mechanism or the die․ Consult your Ridgid manual for specific instructions on adjusting the feed rate and operating the ratchet for your model, ensuring optimal threading results․

Operating a Ridgid Pipe Threader
Proper operation involves careful pipe preparation, secure mounting in the chuck, precise die adjustment, and a step-by-step threading process for optimal results․
Preparing the Pipe for Threading
Before initiating the threading process, meticulous pipe preparation is crucial for achieving clean, accurate threads and preventing damage to both the pipe and the threading equipment․ Begin by thoroughly cleaning the pipe’s exterior surface, removing any rust, scale, dirt, or debris that could interfere with the dies․ Utilize a wire brush or abrasive cloth to ensure a smooth, consistent surface․
Next, accurately measure and mark the desired thread length on the pipe․ Precise measurements are essential for ensuring the threaded joint will properly engage with its mating component․ Deburring the pipe ends, both inside and outside, is also vital․ This removes sharp edges that can damage the dies and create inconsistent threads․ A deburring tool or file can be used for this purpose․
Finally, ensure the pipe is free from any bends or distortions․ A straight, uniform pipe will yield the best threading results․ Inspect the pipe for any pre-existing damage, such as cracks or dents, and avoid threading damaged sections․ Proper preparation significantly extends the life of your threading dies and guarantees a reliable, leak-proof connection․
Mounting the Pipe in the Chuck
Securely mounting the pipe within the Ridgid threader’s chuck is paramount for safe and accurate threading․ Begin by ensuring the chuck jaws are clean and free of debris․ Loosen the chuck handle to fully open the jaws, providing ample space to accommodate the pipe’s diameter․
Carefully insert the pipe into the chuck, centering it as precisely as possible․ Tighten the chuck handle firmly, ensuring the pipe is gripped securely and evenly by all three jaws․ Avoid over-tightening, which could deform the pipe or damage the chuck․ Periodically check the pipe’s alignment to confirm it remains centered throughout the mounting process․
The chuck and collet system must be appropriate for the pipe’s size and material․ Utilizing the correct collet ensures a firm, concentric hold․ Before proceeding, perform a test rotation to verify the pipe spins freely without wobble or slippage․ A properly mounted pipe is essential for consistent thread quality and operator safety․
Adjusting the Die for Proper Threading
Precise die adjustment is critical for creating accurate and compliant threads․ Begin by selecting the correct die for the desired thread type – NPT or BSPT – and pipe size․ Carefully inspect the die for any damage or wear before installation․
Position the die holder and die onto the threading head, ensuring proper alignment․ Gradually lower the die onto the pipe, using the adjustment mechanism to control the cutting depth․ Start with a shallow cut to avoid excessive strain on the machine and die․

Monitor the cutting process closely, making small adjustments to the die position as needed․ The goal is to achieve a smooth, consistent cut without binding or chattering․ Proper lubrication is essential during this stage․ Regularly check the thread form to ensure it meets the required specifications․ Incorrect adjustment can lead to flawed threads and potential leaks․
Threading Process: Step-by-Step Guide
Begin by securely mounting the prepared pipe within the chuck, ensuring it’s centered and firmly gripped․ Initiate the threading process by engaging the feed mechanism and applying steady, even pressure to the ratchet handle․ Maintain a consistent feed rate throughout the cut, avoiding sudden starts or stops․
As the die cuts into the pipe, monitor the chip formation and lubrication․ Add cutting oil frequently to reduce friction and heat․ After each pass, reverse the feed slightly to clear chips and prevent binding․ Continue threading until the desired thread length is achieved․
Once complete, disengage the feed and carefully remove the pipe from the chuck․ Inspect the newly formed threads for any defects or inconsistencies․ Clean the pipe thoroughly to remove any remaining cutting oil or debris․ Proper technique ensures high-quality, reliable threads․

Maintenance and Troubleshooting
Regular lubrication, die maintenance, and cleaning are crucial․ Address common issues like binding or inconsistent threads promptly, referencing the manual for solutions and replacement parts․
Lubrication of the Pipe Threader
Proper lubrication is paramount for extending the life and ensuring the smooth operation of your Ridgid pipe threader․ Consistent application reduces friction, minimizes wear on critical components like the threading heads, dies, and feed mechanism, and ultimately improves the quality of the threaded pipes․
The manual emphasizes using a high-quality cutting oil specifically designed for pipe threading․ This oil should be applied liberally to both the pipe’s outer surface and the cutting dies before and during the threading process․ Re-application is vital, especially during longer threading runs, to maintain adequate lubrication․
Pay particular attention to lubricating the chuck and collet system, ensuring the pipe is securely held without excessive force․ Regularly wipe away excess oil and debris to prevent buildup․ Avoid using abrasive lubricants or solvents, as these can damage the machine’s finish and internal components․ Following these guidelines will contribute significantly to the longevity and performance of your Ridgid pipe threader․
Die Maintenance and Replacement
Maintaining your Ridgid pipe threading dies is crucial for producing accurate and clean threads․ Regular inspection for wear, damage, or buildup is essential․ After each use, thoroughly clean the dies with a wire brush to remove chips and debris, and then apply a light coat of protective oil to prevent rust․
The manual details that dull or damaged dies will result in poor thread quality and can potentially damage the pipe․ Sharpening dies is possible, but often, replacement is more cost-effective and ensures optimal performance․ When replacing dies, always use the correct size and type for the intended pipe material and thread standard (NPT or BSPT)․
Proper die storage is also important; keep them in a dry, protected environment․ Following these maintenance procedures will maximize die lifespan and contribute to consistently high-quality threading results with your Ridgid pipe threader․
Troubleshooting Common Issues
Encountering problems with your Ridgid pipe threader is common, but many are easily resolved․ If the machine isn’t feeding properly, check the feed mechanism and ensure it’s adequately lubricated․ A jammed chuck often indicates improper pipe preparation or an incorrect collet size – verify both before attempting to clear the jam․
Poor thread quality frequently stems from dull or damaged dies; inspect and replace them as needed․ If the machine is difficult to operate, ensure the ratchet is functioning smoothly and isn’t binding․ Always refer to the manual for specific error codes or symptoms․
Consistent lubrication is key to preventing many issues․ Remember to disconnect the power before any inspection or repair․ If problems persist, consult a qualified technician to avoid further damage to your Ridgid pipe threader․
Cleaning and Storage
Proper cleaning and storage are crucial for extending the life of your Ridgid pipe threader․ After each use, thoroughly remove all metal shavings, pipe debris, and cutting oil from the machine’s components․ Use a brush and appropriate solvent, avoiding harsh chemicals that could damage seals or finishes․
Pay close attention to the threading heads and dies, ensuring they are free of buildup․ Once cleaned, apply a light coat of oil to all metal surfaces to prevent rust and corrosion․ Store the threader in a dry, clean environment, ideally covered to protect it from dust and moisture․

Keep the manual readily accessible for future reference․ Securely store dies and chucks to prevent loss or damage․ Regular maintenance, including cleaning and proper storage, will ensure your Ridgid pipe threader remains reliable for years to come․
Pipe Thread Standards & Types
Understanding NPT and BSPT threads is vital․ This section details pipe thread dimensions, tolerances, and the specifics of UNI EN 10226-1 threads for compact flange yokes․
Understanding NPT vs․ BSPT Threads
National Pipe Thread (NPT) and British Standard Pipe Thread (BSPT) are two common thread types encountered when using a Ridgid pipe threader․ While both are used for creating pressure-tight seals, they differ significantly in their design and application․ NPT threads, prevalent in North America, are tapered threads relying on thread interference for sealing – meaning the threads themselves create the seal when tightened․
BSPT threads, commonly found in British and European systems, can be either tapered or parallel (BSPP)․ BSPT tapered threads also rely on interference for sealing, similar to NPT․ However, BSPP threads, being parallel, require a sealing tape or compound to achieve a leak-proof connection․
Crucially, NPT and BSPT threads are not interchangeable․ Attempting to join them will result in leaks and potential damage․ The pipe thread is generally larger in diameter than an inch with equal diameters․ Therefore, selecting the correct die for your application, based on the thread standard required, is paramount for a successful and safe pipe threading operation․ Always verify the thread type before commencing work․
Pipe Thread Dimensions and Tolerances
Understanding pipe thread dimensions and tolerances is critical for ensuring proper fit and leak-proof connections when utilizing a Ridgid pipe threader․ These specifications dictate the precise size and allowable variation in thread parameters like pitch, major diameter, and minor diameter․ Variations can lead to improper sealing or difficulty in assembly․
Dimensions are typically defined by standards like ANSI/ASME B1․20․1 for NPT and BS ISO 68-2 for BSPT threads․ Tolerances account for manufacturing variations and ensure interchangeability between components․ Ridgid threading dies are manufactured to meet these industry standards, but regular inspection is vital․
Accurate thread depth and form are essential․ Using incorrect dies or improper settings can result in threads falling outside acceptable tolerances․ This can compromise the integrity of the joint․ Always consult the relevant standards and the Ridgid pipe threader manual for specific dimension and tolerance information related to the pipe size and thread type you are working with․
Compact Flange Yokes and Threads (UNI EN 10226-1)
When working with systems adhering to the UNI EN 10226-1 standard, understanding compact flange yokes and their associated threads is crucial․ This European standard specifies dimensions and tolerances for compact, short face-to-face connections, often utilized in valve manifolds and similar applications․
These connections prioritize space-saving designs without compromising performance․ The threads used with these yokes require precise threading to ensure a secure and leak-proof seal․ Ridgid pipe threaders, when properly equipped with the correct dies, can accurately create threads compliant with UNI EN 10226-1․
Special attention should be paid to the thread form and pitch, as deviations can prevent proper engagement with mating components․ The manual threading machine RIDGID 700 is equipped to handle these precise requirements․ Utilizing the correct die and following the manufacturer’s guidelines within the Ridgid manual will guarantee compatibility and system integrity․
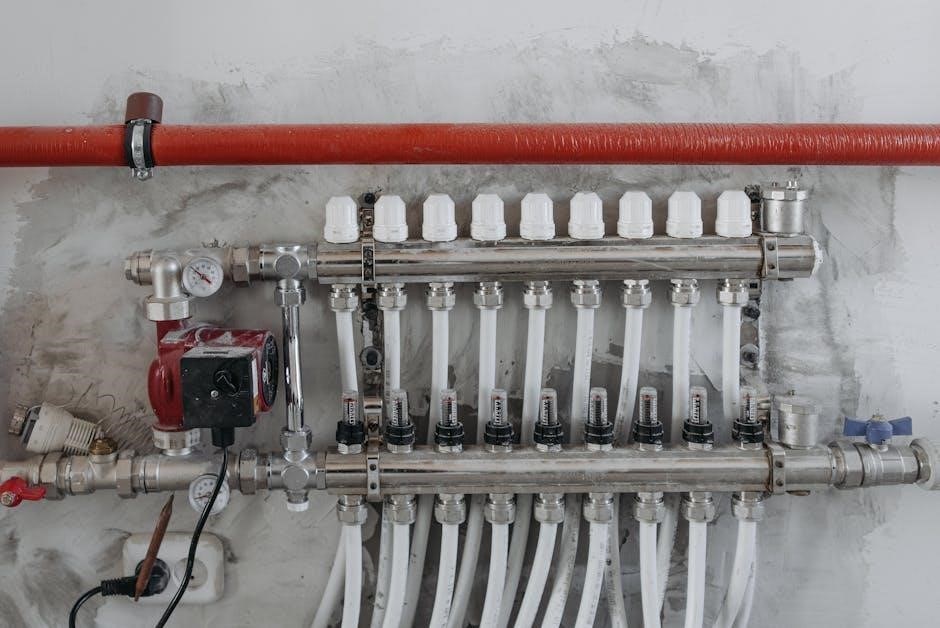
Advantages of Valve Manifolds over Ball Valves
Valve manifolds offer significant advantages over traditional ball valves, particularly in applications demanding precise flow control and reduced maintenance․ Unlike ball valves, the construction of a valve manifold inherently minimizes the potential for sediment buildup within the flow path, contributing to long-term reliability․
This design is especially beneficial in systems where cleanliness is paramount․ The special lever handle found on some manifolds allows for flow adjustment and memorization of flow rates, a feature absent in standard ball valves․ Compact manifolds, often utilizing UNI EN 10226-1 threads, further optimize space utilization․
Proper threading, achieved with a Ridgid pipe threader and appropriate dies, is essential for manifold integrity․ The Ridgid manual emphasizes the importance of accurate thread creation to prevent leaks and ensure optimal performance․ Choosing a manifold over multiple ball valves can streamline piping layouts and reduce the number of potential failure points․